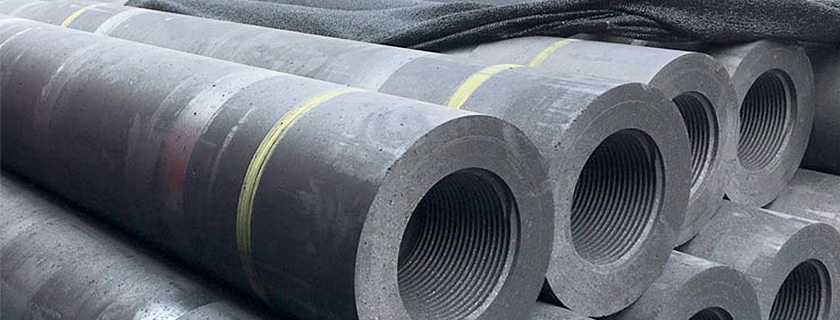
The graphite electrode is structurally composed of a graphite electrode body and a nipple. During the use of the graphite electrodes, the graphite electrode bodies are connected in series by nipples. How is the graphite electrodes bodies and nipples connected in series?
We can better understand the connection of graphite electrodes in series from the characteristics of the graphite electrode body and the nipple itself.
Graphite Electrode Nipple
Firstly, the graphite electrode nipple is like a cone, for connecting the two electrode bodys. The graphite electrode nipple has screw threads and nipple pin.
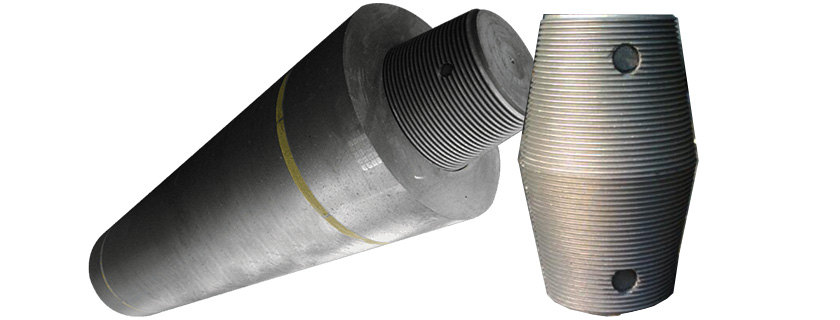
The screw threads, matches the threads in the hole of the electrode body, both are on the same central axis, and get a good grip; and the nipple pin will flow out when heated, making the nipple and body connected more tightly.
Graphite Electrode Body
Secondly, on the graphite electrode body side, the graphite electrode body is the main part of the graphite electrode and is the main conductor. From the both ends, named as the end face, the screw thread in the graphite electrode hole, and the warning line near to the end face.
The end face should be flat, smooth, without holes, burrs, to ensure the both end seamless connection; screw thread, taper deviation is small, pitch is uniform, and deviation is small, matches the screw thread on the nipple; when it comes to warning Line, the placement of the gripper, should be clearly marked.
Graphite Electrode connection
Graphite Electrode nipple connection, cone nipple connection (3TPI & 4TPI).
The Preparation Before Graphite Electrodes Connection
1. Remove the protection hood of the new electrode, check whether the inner thread of electrode hole is intact or not, if threads are not intact, please contact with after sale service members to make sure whether it can be used. Check whether the electrode hole is clean or not, if it is not clean, blow it clean by compressed air.
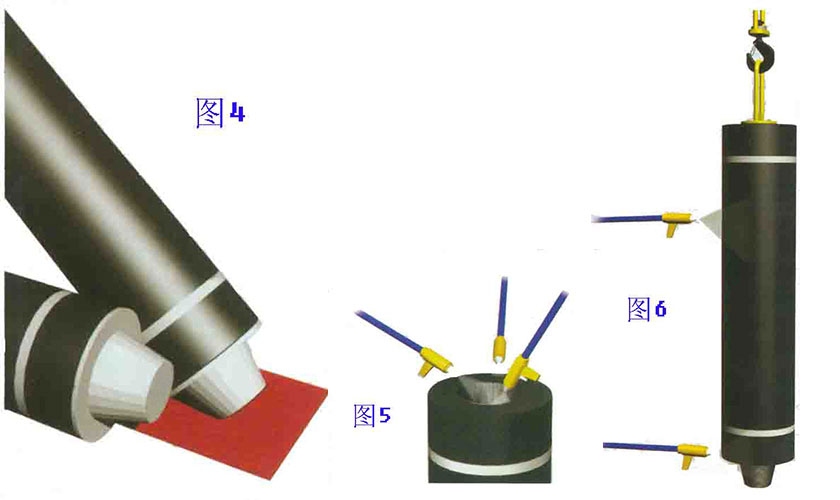
2. Screw hoisting tool into electrode hole, a pcs of soft cushion should be placed at the other end of the electrode to avoid the damage of electrode nipple. As it shows in 图4.
3. Blow the dusts and impurities at the surface and hole of the electrode to be connected by compressed air, then blow the surface and nipple of the new electrode clean, if the surface can’t be cleaned by compressed air, clean it by brusher. As it shows in 图5&图6.
The Installation of Graphite Electrodes
When connecting graphite electrodes,
- 1. Firstly, blow the electrode holes, electrode end surfaces and nipples with compressed air. There must be no dust and foreign matter, and the joints should be kept clean.
- 2. When the two electrodes are screwed in to a certain extent (about 10mm gap), blow it again with compressed air.
- 3. Then, tighten the electrode with a torque clamp and apply the torque when tightening. The gap between the both connection ends is not more than 0.05 mm;
- 4. If there is a gap at the joint after tightening, you must exit and re-join until there is no gap.
The operation procedures of connecting new electrodes
1. Hoist the new electrode above the electrode to be connected, align the electrode holes accurately, then lower it slowly.
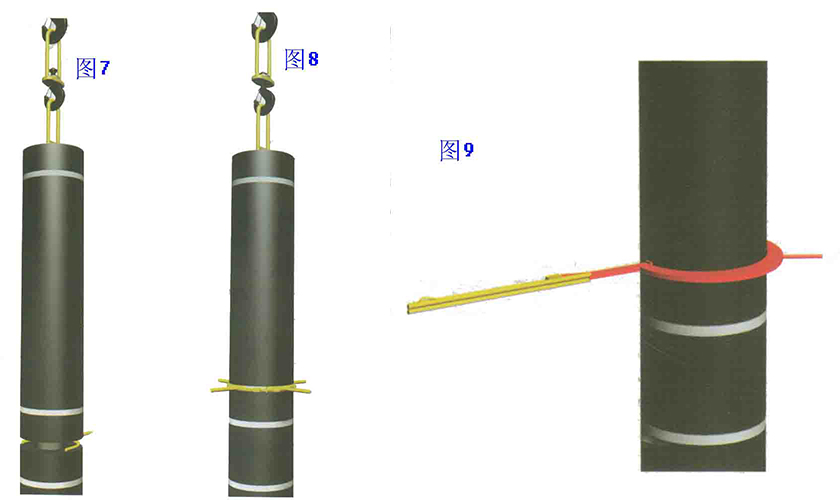
2. Put the separation equipment between two electrodes, then slowly lower the new electrode, to avoid the damage of electrode hole and nipple threads. As it shows in 图7.
3. Lift the new electrode a little to remove the separation equipment, then rotary the new electrode by torque ring, spinal hoisting hook and the electrode rotate and descend simultaneously, until the two ends contact with each other. As it shows in 图8.
4. Use torque wrench to lock the electrodes with required torque. As it shows in 图9.
If there are special requirements for the connection specifications of the electrode Nipples, please consult with the technical department.